Lighting is, indeed, one of the most crucial elements of top-notch videography not just because it produces a clearer, more defined footage, but also because it helps you to set the mood and tell a better story.
In this guide, we will be walking you through the things you need to get the best lighting for your videos. We will shed some lights on the basic forms of lighting, how to get a standard lighting set up, the cost-effective tools you need as a beginner, and some pro tips to rub it all in.
Are you delighted yet? Let’s jump into it!
Contents
Types of Video Lighting
Whether you’re using a high-end Panasonic camera or an iPhone, you can use good lighting to create amazing scenes for your video project.
There are several forms of video lighting. However, the three major types of video lighting include:
- Key Lighting
- Fill Lighting
- Rim Lighting
Key Lighting
Key lighting, as the name implies, is the main light source on the scene. It is usually the one that shines the brightest.
No matter what type of lighting technique filmmakers use, the key light is always the first to get sorted out. Do note that the key light does not have to face the subject directly. It takes a flexible positioning. You can set it on the side or even behind your subject, depending on the mood and objectives of the scene.
However, do not place the key light right beside the camera as this will result in flat and direct lighting, possibly affecting your subject.
Fill Lighting
The fill light serves its purpose by filling up the areas that light failed to reach.
When you use your key light, usually, it casts shadows on some parts of the scene or subject. The job of the fill light is to minimize these shadows.
Do note that shadows are important elements and give your scene a cinematic ambiance. Thus, you might want to just tone them down instead of completely eliminating them.
Rim Lighting
Also known as the back lighting, this form of lighting is used to create a three-dimensional scene. It is usually placed behind the subject.
The rim light is best used for lighting up the edges of the subject, effectively separating the it from the background. In a nutshell, it is used to make the subject stand out.
Other forms of lighting include:
- Side Lighting: Lighting placed at the side to create a dramatic scene.
- Practical Lighting: Lighting that uses regular light sources like lamps, lightboxes, candles, etc. to create cinematic nighttime effects.
- Hard Lighting: Lighting that casts strong shadows with crisp edges, used to emphasize depth and texture.
- Soft Lighting: Lighting that wraps around its subject and casts gentle shadows and soft edges.
- Bounce Lighting: The use of reflectors to bounce light from strong light sources to the subject.
- High Key: Lighting that uses high exposure to create bright scenes with no shadows.
- Low Key: Lighting that uses low exposure to create dim scenes with lots of shadows. It’s mostly used in dramatic, mysterious scenes.
- Motivated Lighting: Lighting that imitates a natural light source such as sunlight, moonlight, streetlights, etc.
How to Set up Your Lighting
In this section, we’ll be taking a look at how to create a solid lighting setup using a simple technique called the 3-point lighting setup.
The 3-point lighting technique is popular among filmmakers and vloggers, and it incorporates the three main lighting techniques—key lighting, fill lighting, and rim lighting.
Whether you’re shooting a YouTube video or making the next blockbuster movie, the principles are the same. You can create different results by using unique creative angles.
So, let’s get down to it!
Step 1: Turn off the Light!
The aim here is to create a blank canvas of darkness where you can start throwing light in from different angles. Lighting your scene and subject should be treated like a work of artistry. That way, you’d enjoy every step.
Once the room is reasonably dark, it is time to turn on the first light.
Step 2: The Key Light
As you’ve already seen, the key light is usually the first to get turned on. It is the primary source of light for the scene or subject. The key light always creates shadows, so it is your goal to choose where you want the shadow to fall.
Setting the key light above your subject will cast shadows under your eyes, nose, and chin. Placing the key light on the side creates a more sculpted effect.
A great way to start is to set it at 45 degrees from your subject. You can also play around with its positioning to effectively capture the mood of the video.
Step 3: The Fill Light
Now that you’ve had your key light on, it’s time to take care of the shadows.
The fill light is usually twice as soft as the key light and positioned on the opposite side. It’s best to use dimmable lights so you can conveniently adjust the intensity until you have just the right amount of shadows.
Step 4: The Rim Light
With the key light and fill light, you’d already gotten your subject well-exposed. However, you’d notice that the darkness in the background is wrapping itself around your subject.
To make your video a lot better, you need to create a distinction between your subject and the background. That’s where the rim light comes in.
The rim light is placed at an angle above the subject and makes the outlines of the subject more pronounced. This is great because it will make the image less flat and more dimensional.
Step 5 (Optional): Practical
By adding the rim light, you already have a standard lighting setup. However, you can still throw in some aesthetics to end the process with a bang.
If you have a bed lamp, a laptop, a candle, an LED strip, or any regular light source you have lying around, you can neatly set them up in the background.
This will completely change the look and feel of your background, making it more aesthetic and welcoming to your viewers.
Best Lighting Equipment for Videos Under 160 Dollars
Setting up a standard lighting doesn’t have to cost you a fortune. In this section, we’re going to show you some lighting equipment you can use to bring more warmth and energy to your video, even if you’re on a tight budget.
Let’s dive into it!
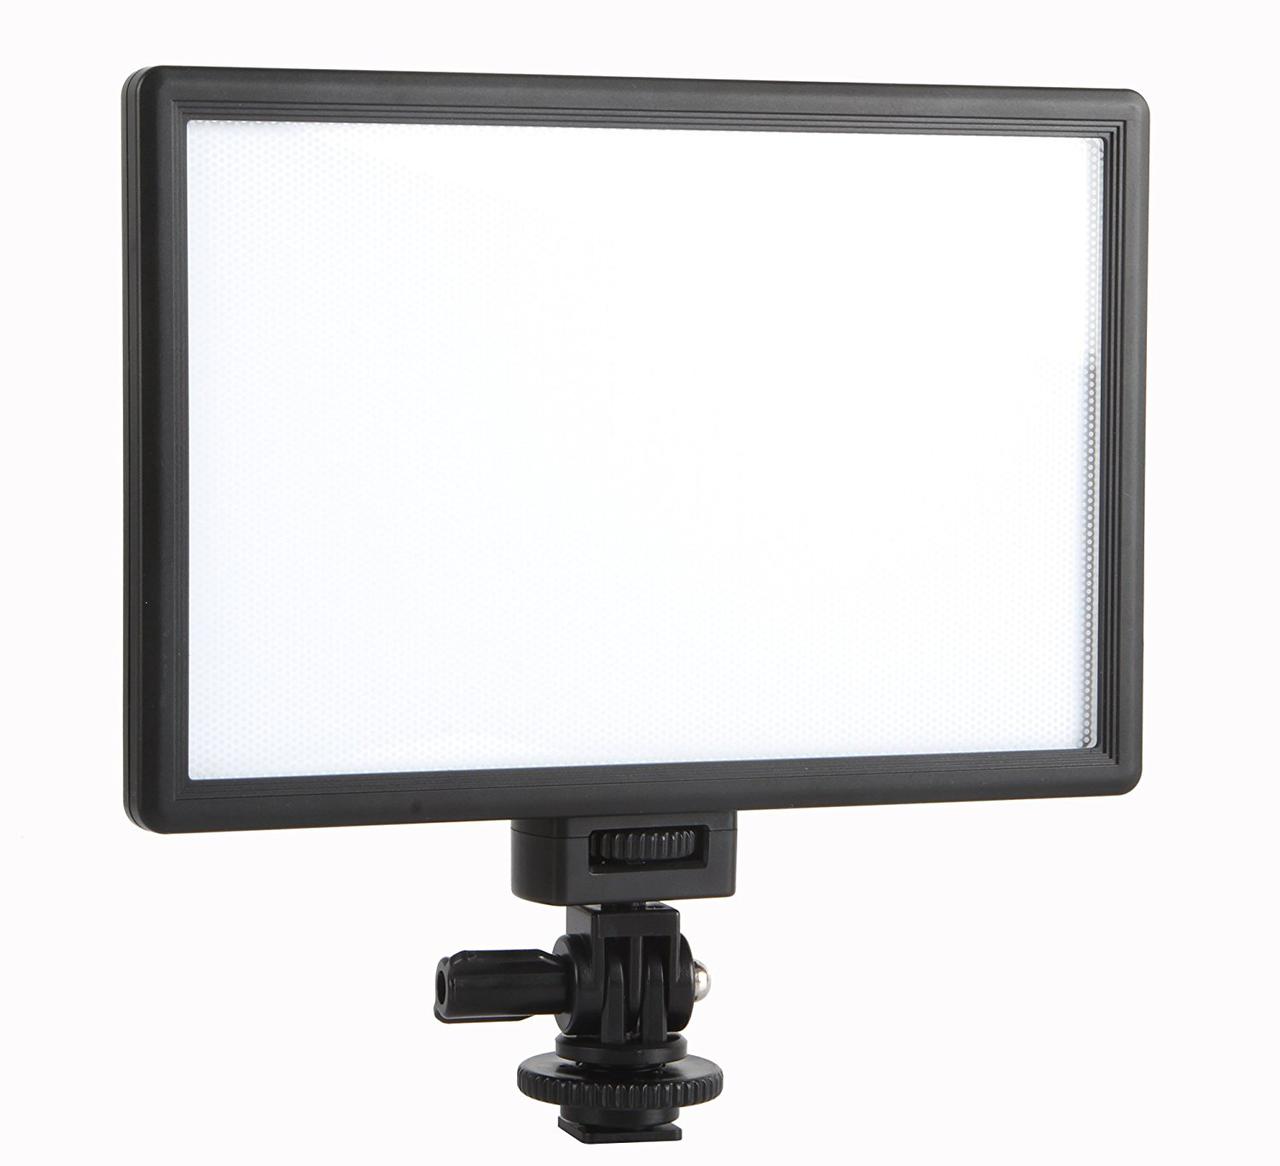
Key Light: Viltrox L116T LED Light with Adapter and NPF Batteries ($81.97)

The Viltrox L116T is an excellent piece of lighting equipment to have when you’re just starting out. The fact that it’s cheap might get you skeptical at first, but then you’d be in for a surprise because it does all the things you’d need a key light to do.
This light is dimmable, has a great output, is relatively soft, and allows you to adjust the color temperature from 3300k to 5600k!
The big pro is a friendly interface, showing your battery percentage in digital format.
It also has a PWM light adjustment feature that helps you optimize power consumption. The L116T also features an AC adapter for filming indoors and a battery compartment for filming outdoors.
Here’s a more detailed breakdown on the prices of the items on the kit:
- Viltrol L116T light: $37
- AC Adapter: $14.99
- NPF Battery: $28.99
The NPF Battery comes with a charger, and even though it lasts for up to 4 hours on continuous usage, it still comes with two backup batteries for emergencies. Also, its charger can charge two batteries at once.
Fill Light: the LimoStudio 5-in-1 Reflector Kit ($36.59)

The 5-in-1 reflector kit is a super-versatile tool for shaping light. The five reflectors come in different shades: gold, silver, white, black, and translucent.
The white reflector is used for filling out shadows. The black one is used for blocking off unwanted light (negative fill). The silver one is used for applying a cool bounce. The gold reflector is used for creating a warm bounce, and the translucent one is used as a diffuser.
You can try out each of them to see the cool effects you’ll get.
However, for filling out shadows, the white and silver reflectors are the best ones to use.
It also comes with a light stand and reflector clip so you can conveniently hold these reflectors in place.
Rim Light: Viltrox L116T LED Light (37.99)
For the rim light, you’d need another dimmable LED light. For this purpose, the Viltrox L116T can serve perfectly. And since you already have one full kit with an AC adapter and a couple of NPF batteries for your key light, you do not need an extra battery or AC adapter.
Total cost: $156.55
So, that’s it, a standard set of lighting equipment: beginner-friendly, budget-friendly, and effective!
5 Best Lighting Tips to Improve your Videos
Now that you’ve gotten your lighting equipment all figured out, how do you use them to the best of their abilities? How do you create better videos with your lighting setup?
Needless to say, you should plan to get more advanced lighting equipment as you grow in authority and skill, and at that point, more advanced tips would be vital for you.
However, at your level as a beginner or intermediate filmmaker, you should be able to maximize the basic tools you have at your disposal.
So, here are some great tips to note down!
Take Advantage of Natural Indoors Light during the Day

If you’re shooting indoors during the daytime, your windows are your best friends for awesome natural lighting.
Ensure the windows are in front of you when filming. This will help you achieve the balanced exposure you need.

If the light from your room’s window is too hard, you can use your translucent reflector to diffuse them.
Use Practical Lighting to Take your Videos out of the Box

We already touched on what practical lighting is. This process requires your creativity. Look for any light source in your building: bed lamps, candles, LED strips, etc. Neatly arrange them in your background, and you’ll have your video looking amazing.
Embrace the Darkness
Indeed, it is in the presence of darkness that the beauty of light shines through. This applies even in cinematography. You do not want to completely knock out the darkness from the scene. It will make your subject appear flat and unnatural.
Allow a bit of shadow here and there, especially when using your fill light.
This is why you should always make your key light twice as bright as the fill light.

Also, darkness can be used to add a mysterious tone to your videos, and depending on what you want to achieve, it can come in handy.
The Larger the Light Source, the Better the Picture
A broader light source results in a softer image with fewer shadows. You can achieve this by bouncing the light through a reflector or diffuser.
How to Position your Lighting Equipment
The best way to deal with your light positioning is to bring it as close as possible. This is to help you maximize the exposure.
However, if you are using a dimmable light, you can adjust the intensity and positioning accordingly.
Also, your light source should be positioned a little bit higher than your subject and inclined at 45 degrees. It is also better to set it at an angle of 45 degrees and not directly in front of your subject.
Conclusion
I hope you found this guide enlightening—pun intended.—Let us know what lighting equipment you’re looking to get. Do you have any tips you’ve found helpful? Do you have any questions? Let us know in the comments.
Also, if you haven’t done that already, feel free to try Animotica, our simple, yet fantastic video editor.

Cheers!
You might also like:
40+ Tips from Successful Filmmakers to Beginners [Interview with PROs]