
“Beer is proof that God loves us and wants us to be happy.”
Benjamin Franklin
Once again, the world’s largest beer festival and travel funfair is here. Germany is having a massive upturn of fun-loving people from all corners of the world. With over 6 million people storming Munich, Oktoberfest holds promises of memories that can last a lifetime, for those who put in the work!
What does this mean for you as a business?
This spells a new opportunity to launch an effective ad campaign. At this point where everyone is in a spending mood, you don’t want to pass on the prospects of making awesome video ads that will get people flooding in your direction.
So let’s say you have a ton of ideas stuck in your head. You’re pretty sure that if you can work this idea into a video ad, you’d be raking in conversions in no time. But then you’re stuck with the process: you don’t know how to make a great video ad.
Perhaps, the one you did in the past was so awful, it wouldn’t even convince a six-year-old.
Don’t sweat, though. Making a video ad is not as hard as you think. And making a perfect Oktoberfest video ad is definitely a breeze-through. You just have to follow the processes below.
For the sake of example, we created this very simple video ad for one of the bars in Munich.
Contents
Gearing Up
Indeed, with the availability of video editors such as Animotica, it has become a lot easier to make video ads that draw attention and stir actions.
However, to ensure that you get everything right, you need to be on point with every step.
Before you proceed with editing, you have to make sure you have covered these crucial preliminary steps described below.
- Get a Script – Several people make the mistake of putting a video ad together without a script at hand. This makes you miss out on essential points that need to be included in your video. Take your time to create a script first, mapping out the strengths of your business and every detail the customers need to know. Never miss your call to action. You can tweak your script to flow smoothly with Oktoberfest, so it organically talks to your target audience without appearing forced.
Out of the event video ad potential customer should get the next information:
- what is the occasion – Oktoberfest, in our case;
- what is the offer about – in our example Black Horse bar offers every customer who buys 5 beer free sausages (yummy!);
- how to get it (when/where) – the bar address in Munich, Germany, you can get it during the mentioned dates.
- A Perfect Stockpile of Images and Video Clips — Ensure you have it all set beforehand. If you’re taking the photos and footage using a camera, take as many shots as possible until you’ve arrived at those shots that tick all your boxes.
And if you don’t have a time for that, you can check up these websites offering royalty free videos and music for your ad.
- Have the Right Software – There are several video editing software all over the internet. However, a large percentage of these products are not equipped with the best features that make video editing fun, easy, and effective. Ensure you have the perfect software for the job, for example, Animotica for Windows 10! We would recommend iMovies for Mac owners.
- Condition Your Mind – At this point, you’re almost ready to go. Ensure that you’re not distracted during this process because the quality of your video ad determines how much results you would get. So be prepared to give it your best dose of creativity. After all, you’ll be happy you did.
Getting Your Hands Dirty
Now that you’re prepared, it is time to get down to the technical aspects. Don’t let the term ‘technical’ get you scared. English has a way of making easy things sound hard. So, moving on, the process is a cakewalk. You only need to follow the steps below.
Note that Animotica is the software we’ll be using to show you how to make the perfect Oktoberfest video ads. It is pretty easy and fun to use, and is excellent for any kind of video editing tasks.
So, it is a good idea to get it too. This will make things a lot easier for you as you learn.
Let’s get down to business.
1. Create a New Project
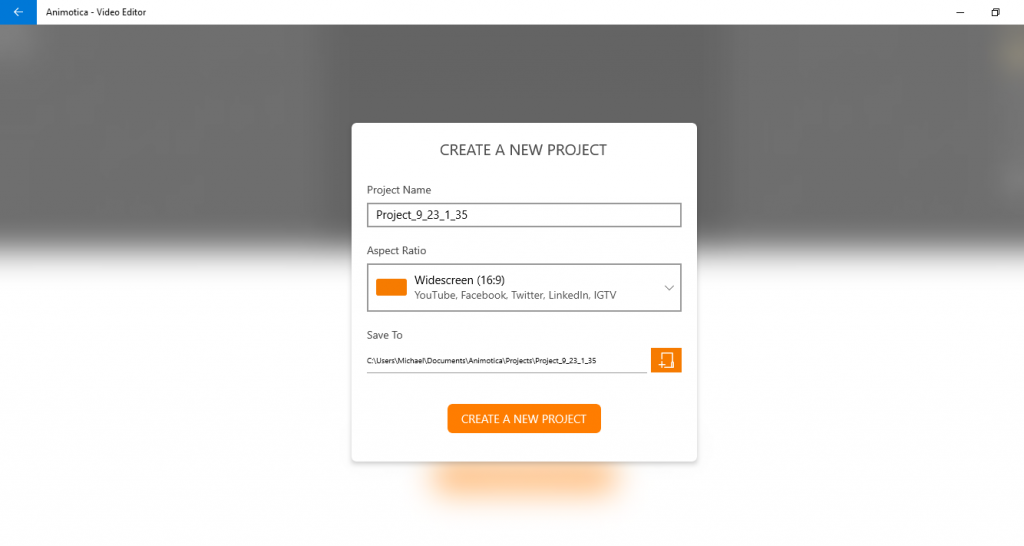
When you open the software, you should click on ‘create a new project.’ This brings you to a new window. Select ‘Empty Project.’ Having done that, set a name to your project. Don’t forget to set a storage path as well. Make sure the project is set to be stored at a location you can easily find.
2. Set Your Aspect Ratio
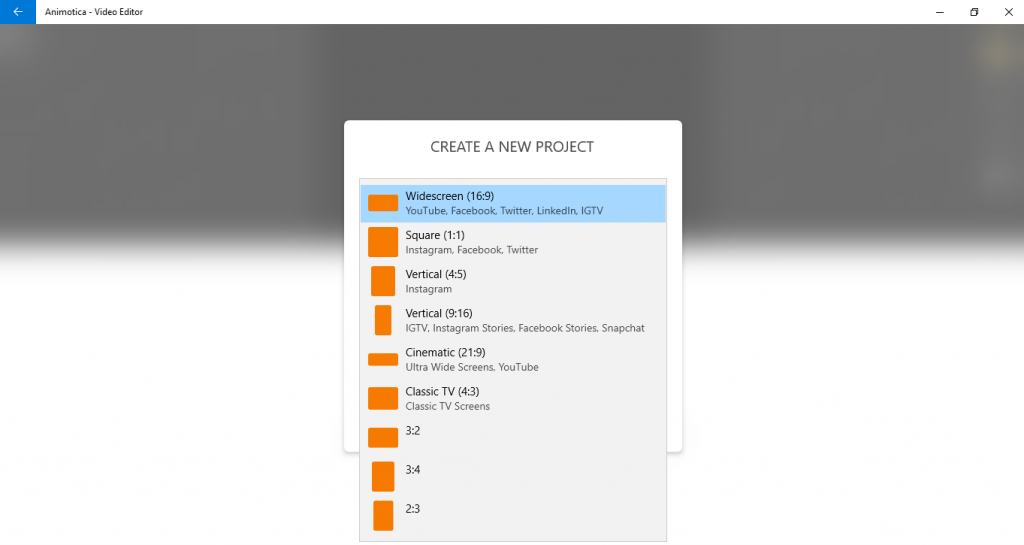
There are usually different aspect ratios for different platforms. The Animotica software automatically sets the option to ‘widescreen (16:9),’ which is the ratio for YouTube, Facebook, Twitter, LinkedIn, and IGTV. If you’re planning on using the video on Instagram or Snapchat, there are other options clearly shown for you to choose from.
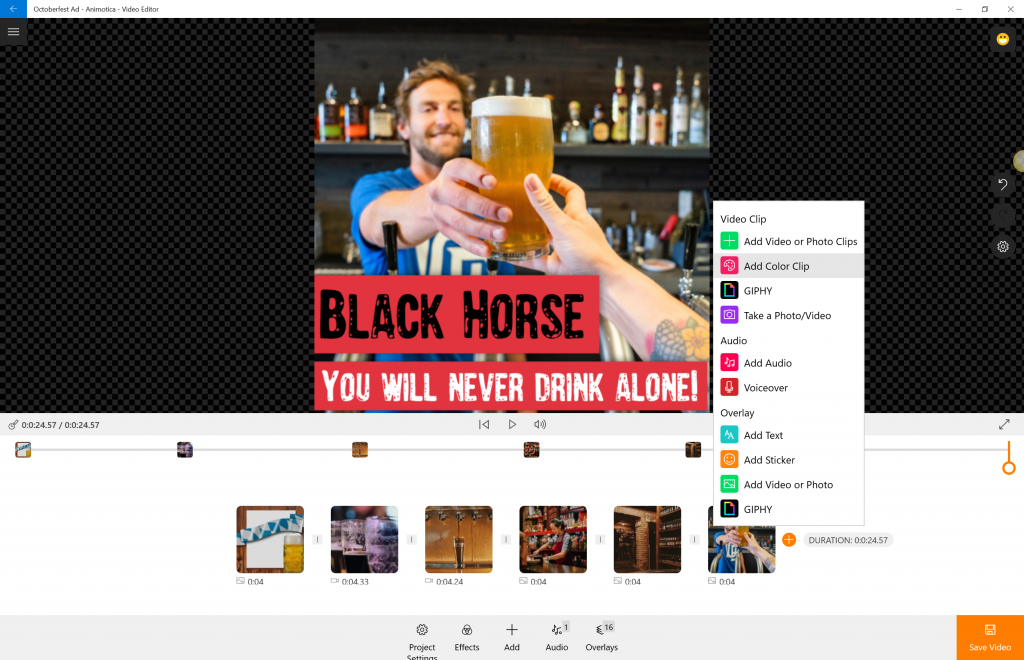
3. Add Video and Photo Clips
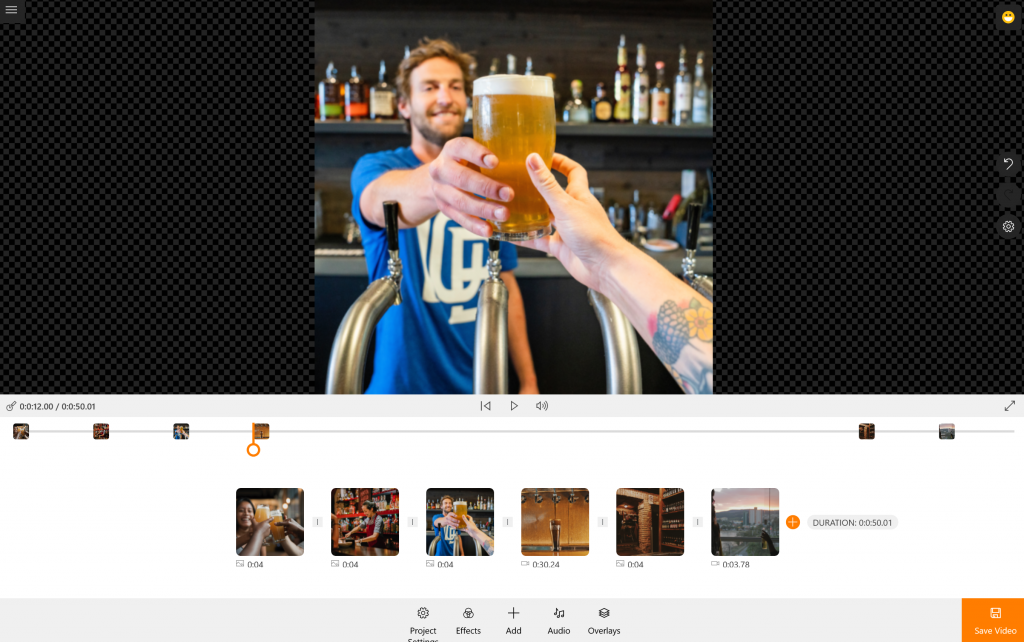
At this moment, we have already downloaded photos and videos from the stock This process can take a while. And now you can start the actual work. On clicking the ‘Add Video/ Photo Clips’ Button, you’ll find another menu. From this menu, you can decide to add videos, photos, GIFs, or even record a video or take pictures directly from the software!
For each video or picture you add, there is a wide range of things you can do to enhance them. You can click on the specific item to rotate, trim, transform, change the background, and do several other things you like. Feel free to click on the item you’ve added and explore the options.
To add more images and videos, simply click on the plus button beside the already existing item and select your chosen image or video.
4. Overlays
4.1 Add Text and Images Overlays to Your Video
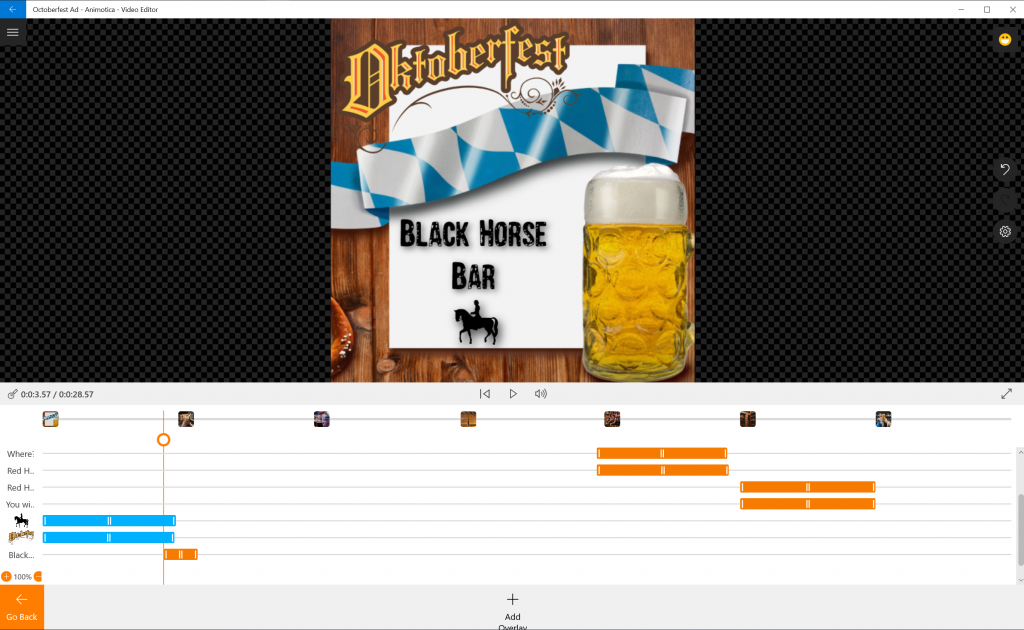
Overlays, like the name suggests, allow you to add texts, emojis, or even pictures and videos, over an already existing item.
The most commonly used overlays are texts, and they always occur over color clips. This is so because, a text overlay is your chance at highlighting a key strength of your business, issuing a call-to-action, or any crucial message that needs to be passed across, in text.
To add a text overlay, click on the item you’d like to overlay, then click on the add button. Click on “Add Text”. It brings you to a window where you can type in your text. Input your desired text. You can set the alignment to left, center, and right, using the icons at the foot of the page.
Once that is done, go ahead and click on the “X” button at the top right corner.
In our example, we transformed into text overlays our text script that had been prepared before we even started picking the images.
We suggest you to add text overlays first and then adjust their positions on the track.
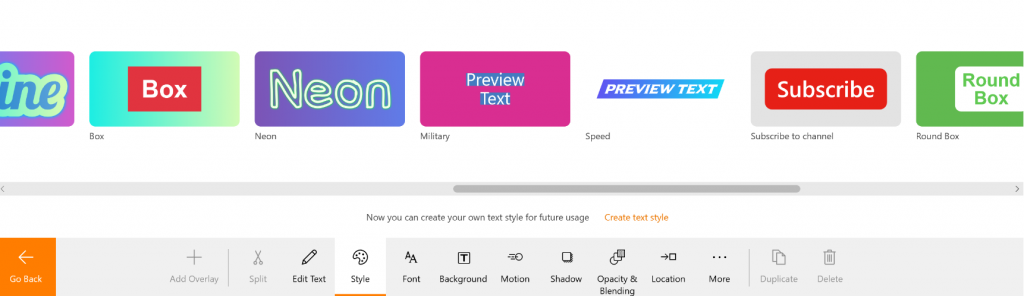
With your text now overlaid, there is a myriad of things you can do to add effects to it. You can set the font, background, motion, shadow, and more. It all depends on you. Again, be creative and curious—experiment!
4.2. Add Stickers To Your Oktoberfest Ad
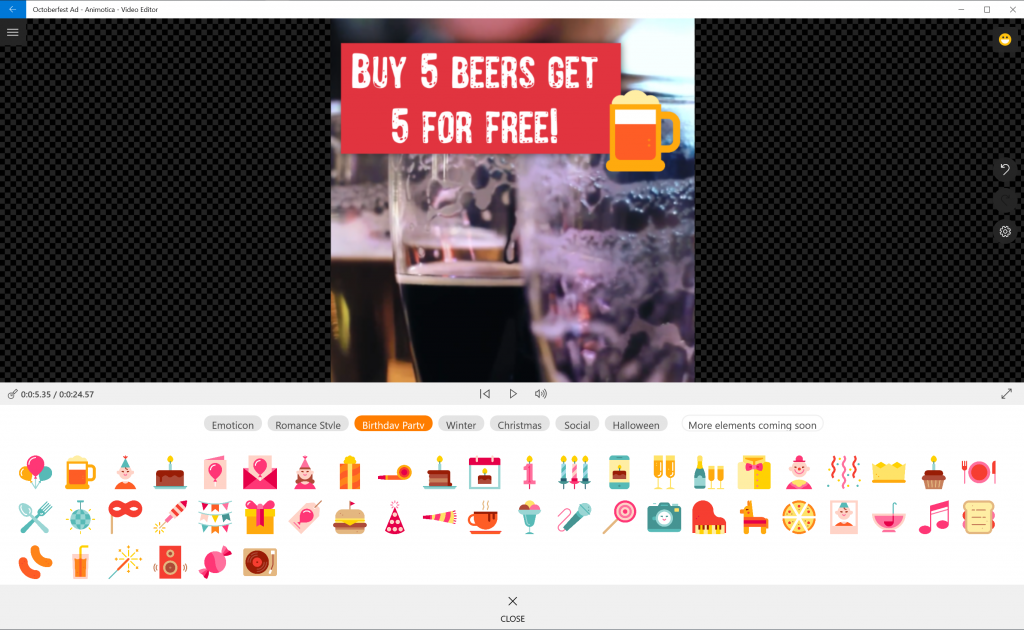
In Animotica you can find stickers library sorted by occasions. Though we don’t have Oktoberfest stickers section yet (!), you can pick some from ‘Birthday Party’, ‘Emotions’ and other folders.
4.3 Add GIF Overlays to Your Video
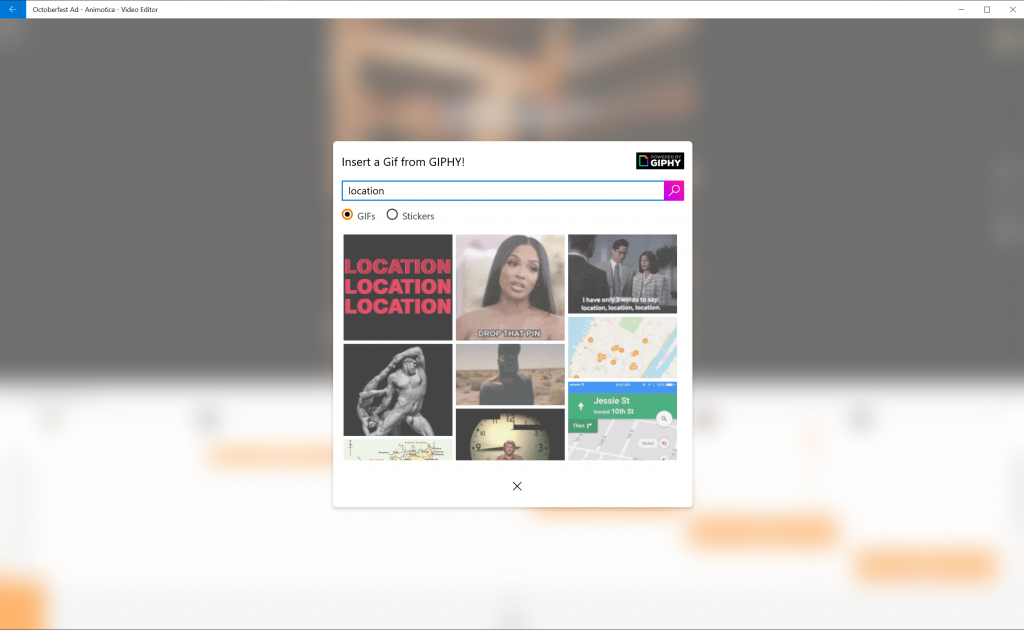
Animotica is one of not many movie makers that allows GIF overlays, so you can directly pick a gif file from the GIPHY database, or upload one directly from your computer.
Learn more about how to add GIF overlays to your video.
In our example we used ‘Dancing man’ from the GIPHY database. To make it look good on our background clip, we had applied ‘Chroma Key’ effect so the background disappeared.
Learn more about how to use Chroma key (Green screen) in your video clips.
5. Add Motion Effect to Your Clip
You would probably want all your beautiful elements to appear in some logical order. For that you have ‘Motion’ feature in Animotica.
- Select the overlay you want to apply motion to.
- Click on ‘Motion’ in the bottom menu.
- Select the motion effect you want to apply.
- Set up duration of the effect at the beginning and the end.
The same principle works for your clips.

6. Transitioning
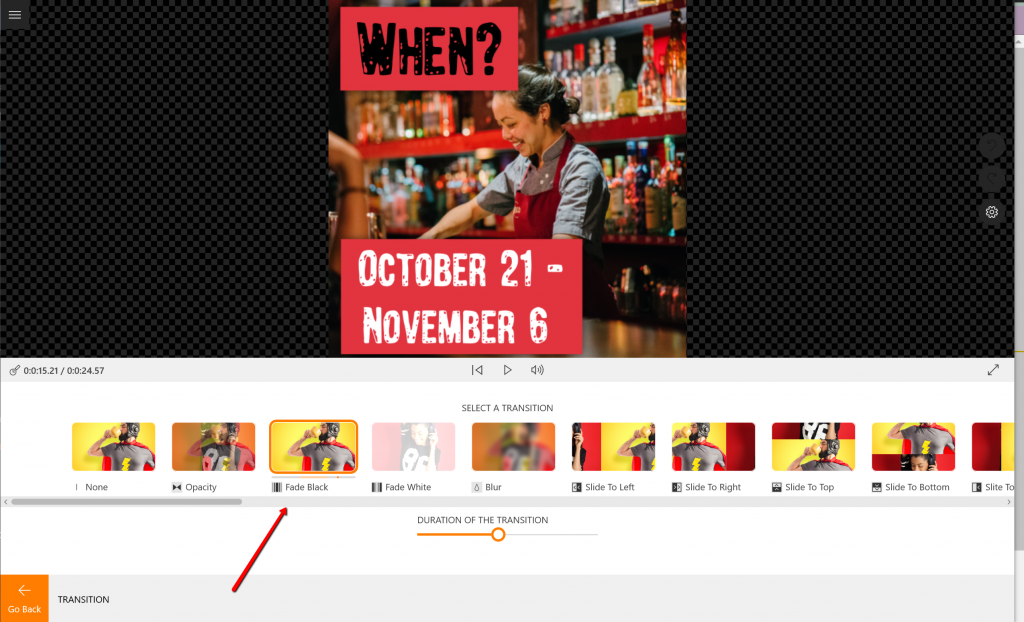
In our example we used Fade Black transition.
Since you’re working with several images and videos, it will be awesome to make use of transition effects. This gives your video ad a touch of professionalism and creativity. To set a transition effect, click on the “Project Settings” button at the bottom. of the screen. Select Transition. This leads you to a set of transition options.
You can just click on each transition style to see how they work, and then select the one that appeals to you. Also, you can set the duration of the transition—if you want a fast transition, a medium, or a slow one, it’s all your choice!
Note that this sets one transition effect for all the clips in the project. To set specific transition effects between clips, you should click on the small gray box in-between your chosen clips. This pops up the transition effects you can choose. Repeat this for every other clip you want to add a transition to.
You can also use Color clips for the sake of transitions, or if you simply what to use blank clip with overlays.
Color Clip
A color clip is simply a blank colored page. It could be black, white, or purple—your choice.
Click the add button, a pop-up appears. Click on ‘color clip,’ a new window comes up. Click on the small colored box at the center of the screen, a collection of colors appear. You can select basic colors, gradients, or RGD/HEX.
Feel free to experiment and have fun while you’re at it. You can set the opacity, along with the duration of the color clip.
A color clip is used mostly as a background when you want to insert a text, emoji, or other overlays in between photo or video clips.
Learn more about how to add video transitions to your video.
7. Add an Audio Clip
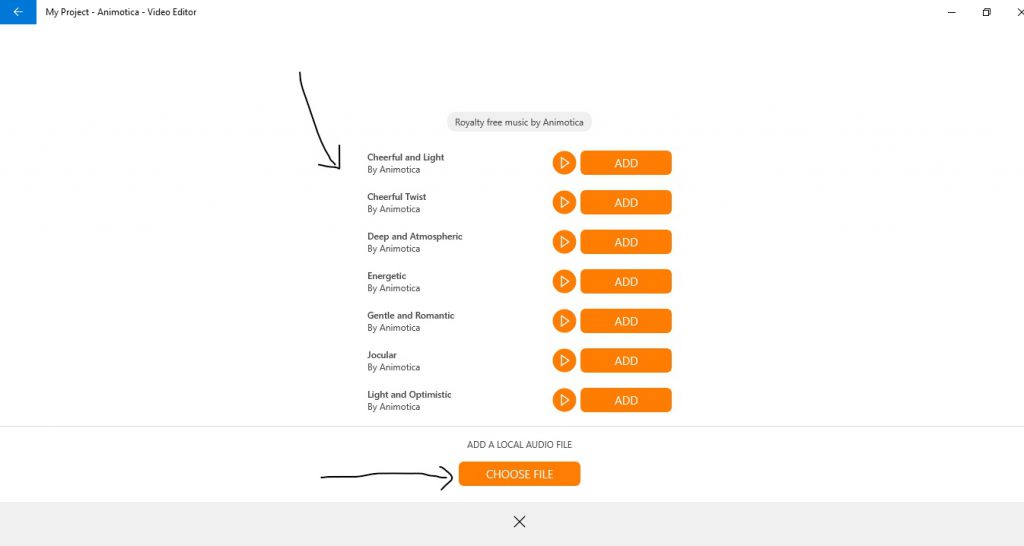
If you’re putting together a group of images and videos from different scenes, an audio clip is crucial.
You can either add an audio clip that is suitable for your project or use the ones provided in Animotica’s library. To add an audio, you should first set the starting position of the audio by dragging the indicator to the desired position (though, if you missed this step, you can adjust audio position after selecting the file).
Having done that, you can now click the orange-colored “+” sign. Proceed with choosing your desired audio clip from Animotica’s library or add a local audio file from your personal library.
In our example we picked the first audio from Animotica library.
8. Experiment
The things I’ve talked about above are enough to get you rolling. However, Animotica packs more fun options which you can try out to give your video an extra sparkle. Don’t be afraid to experiment, if you mess up, hit “undo” or “Ctrl Z” on your keyboard. Just have fun while you’re at it.
9. Saving Your Project
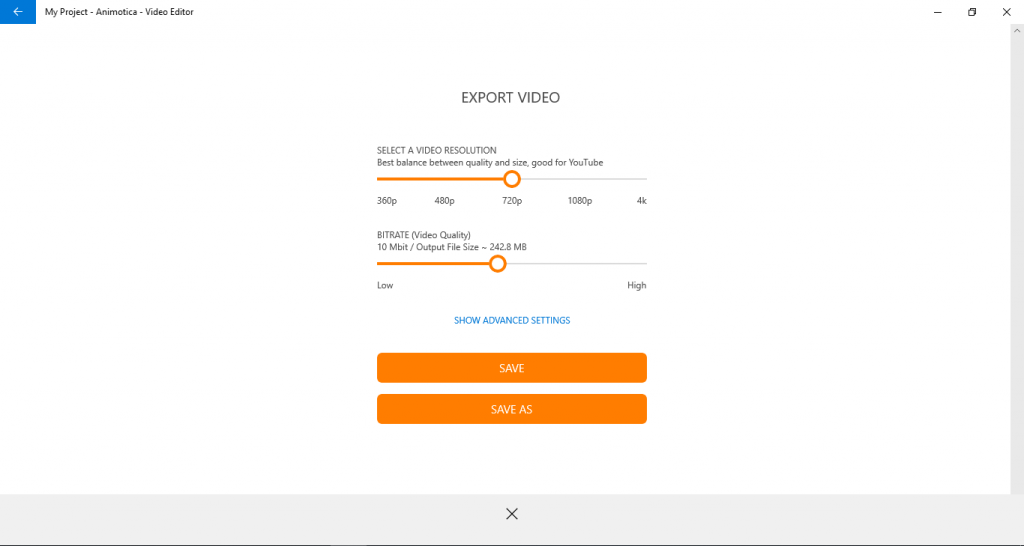
Once you’re done creating, you need to save your project. To do that, click on the Save button at the bottom right corner of the screen. It takes you to an exporting window. You’ll see options for setting the video resolution as well as the bitrate.
For video resolution, 720 pixels is the best balance between quality and size. Selecting a lower resolution will result in a smaller size and lower quality. Conversely, increasing the resolution will result in a larger size and quality.
For bitrate, the best balance is 10Mbit. Going below this will result in low quality but fast export while going above it will result in higher quality but slower export.
After making your choice, click on save. Grab a bottle of water or something nice, and allow the software to render the project for you.
Upload Your Video Ad to YouTube
You can also save your time and upload the video ad from Animotica directly to YouTube.
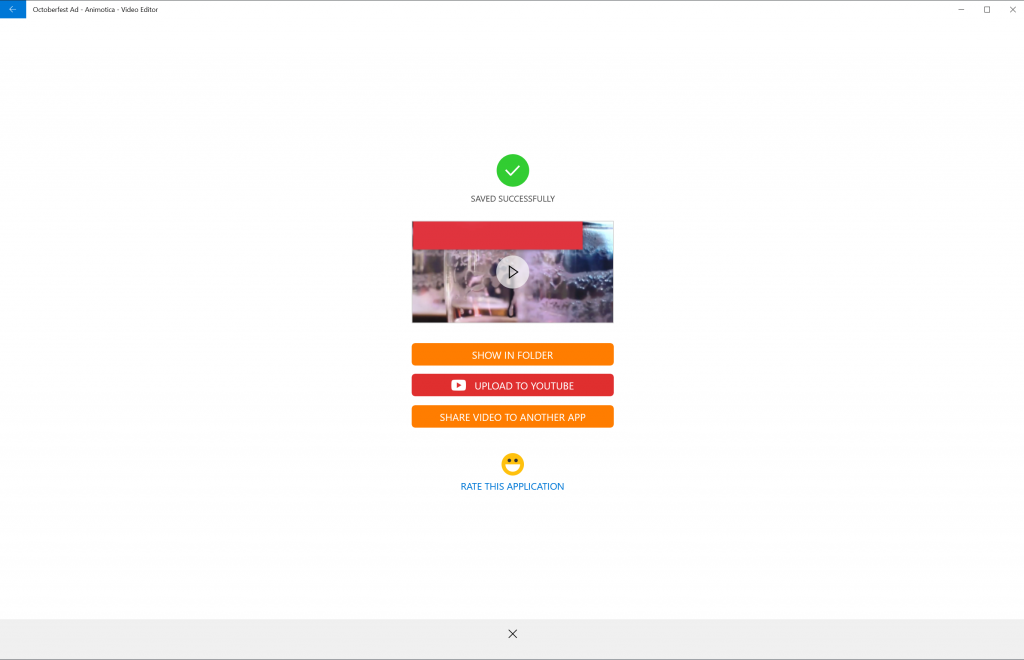
To do this, you will need to sign up to your Gmail account and select YouTube channel you want to upload video to. After that you can type the title, description and tags, and select the video visibility option (everything that you would have need to do on YouTube when uploading the video).
How to Make a Simple Oktoberfest Video Ads: Crucial Tips
Every great video ad has a number of things that make them stand out. A great video ad has a clearly defined message, has a target audience, talks about a solution to a problem, uses a storytelling approach, has a call to action, among other things, which brings us to offering these series of tips to enable you to come out with a masterpiece.
Here we go.
Start off Strong
This is simply saying that you should make the first few seconds count. The beginning of your video ad is mission-critical because if your audience is not hooked right off the bat, they’d simply hit skip as soon as they get the chance. The plan is to get them to watch till the end of the ad, and what better way to do that than hooking them from the get-go? Start your video ad with something perfectly scintillating.
A Clearly Defined Message
A clearly defined message is what makes your brand stand out. What is your motive? What impressive strengths do your business boast of? Make it clear, and don’t forget to be creative.
Know your Timing
A perfect video ad does not linger too long. The ideal timing is tagged at 30 seconds. Try to fit your message and every element of your video ad within this time frame. Sometimes, though, you may have to exceed this optimal time frame, especially when you’re telling a story about your brand.
Feel free to make longer videos, but make sure they’re not full of unnecessary elements.
Talk about the User’s Need and a Solution
Your aim to draw them to come to do business with you. You have to let them understand that you have identified their need and have come with an appealing solution. A video ad that talks about a problem and a solution is more likely to convert.
Storytelling
This is all about your approach. Throwing your business at your audience’s face is likely to get them more agitated than interested. You need to gain some mastery with the art of storytelling because this technique allows you to draw their attention and creatively work them into watching your video ads until the end.
Use a Call to Action
Assuming that they would take the required action by merely watching your video is akin to gambling. You need to tell them what to do. Use a call to action. Your call to action is best added at the end of the ad, after the message has been passed across.
You can tell them to click a link, call a number, or whatever you want them to do. It’s your call!
Conclusion
With Oktoberfest already in full swing, many businesses are already making video ads and reaching customers. Joining the train is as easy as rolling the dice. With the use of great software like Animotica, and by applying the steps and crucial tips discussed above, you can easily get on your to hitting some gold.
Make sure you experiment, be creative, take your time, and create that masterpiece!


1 Comment
Pingback: How to Freeze Video Frames in Windows 10 in Three Easy Steps - ANIMOTICA Blog