Why do you want to learn how to make a time-lapse video on Windows 10/11?
Maybe you’re a fan of Nat Geo Wild, or perhaps your attention has been piqued by a viral 30-second video of a seed breaking through the soil and blossoming into a radiant, elegant flower. Seeing hours, days, months, and years compressed into a few minutes or even a few seconds have its unique way of making your curiosity come alive.
And while each time-lapse footage you’ve seen may seem so clean and intricate, it is something that almost anyone can do. All it takes to create timelapse from photos or video in Windows 10/11 are the right photography tools, an awesome time-lapse movie maker, some motivation, and a great guide!
Let’s hop into it.
Contents
What Exactly is Time-lapse, and How Does it Work?
Without boring you with some long, ‘formal,’ Wikipedia-ish definition, here’s what time lapse is:
Time-lapse is a technique that allows you to record and compress scenes or events that usually take hours, days, months, or even years to happen, into a few seconds. This ultimately gives you the illusion that time is moving rapidly and, thus, lapsing. At the most basic level, time lapsing is just the process of speeding up a video.
Here are some amazing clips that show what a time lapse really looks like.
It usually takes 10 days for a bean seed to germinate. However, this video goes all the way up to 25 days, capturing every moment of growth, and we see it all in less than four minutes!
Since the inception of time-lapse photography in the late 1800s, this technique has been used in movies, documentaries, music videos, etc. Nat Geo Wild, for example, binges on the time-lapse technique!
How time-lapse works
Firstly, videos are actually made of images captured in rapid sequences. On average, a 1-second video comprises 24 images. In technical terms, this is what is referred to as frame rate
Recording
To make a time-lapse video, some advanced professionals usually take individual still photos of their chosen event at specific intervals, then combine these photos to form a video.
However, the more popular way of time lapsing involves setting up a camera at a strategic position and taking a long, nonstop record of a subject from start to finish. For example, you can set your camera in a location that allows it to capture the sunset. From this position, you’ll begin recording from the moment you feel the sun has begun to set until when it has completely gone out of the sky.
Editing
After the recording phase, the footage is then imported into a post-production software, where its speed is substantially increased to give that lapsing effect.
At this level, you will be pretty fine doing time-lapse videos with this technique. In fact, a vast percentage of videos all over YouTube use this fundamental technique.
For your post-production, a simple video editing software can do the trick. This is where Animotica comes in. Animotica is a simple, sleek, and effective Windows 10/11 software that caters to your post-production needs.
Classic Time-Lapse Video Ideas
Since time-lapse photography became popular, several events/subjects have been brought under the spotlight. However, here are some of the most approached subjects of time-lapse photography. There are millions of footage centered around them, and it’s incredible how videographers approach the same subjects from extremely diverse angles. So since you’re looking to make one yourself, here are a few time-lapse ideas you can use.
- Growing plants or opening flowers
- Sunrise or sunsets—or both
- Moving clouds
- City lights at night
- Evolution of a construction project (e.g housing project, demolition, etc.)
- Painting, drawing, or crafting processes
- Decomposing matter
- Starry skies
Feel free to throw your ideas into the comment section!
How to Make a Time-Lapse Video on Windows 10/11
Tools to record time-lapse video
As already established, knowing how to make a time-lapse video on Windows 10/11 is not complicated at all. Here are some tools you’ll need.
A Camera
It’s crucial to have a camera that captures high res images so that you will have clear footage that you can zoom in and out without altering its quality.
A Large Memory Space
Time-lapse footages are no joke, you’re going to be absorbing hours, days, or even months to accomplish a time-lapse project. Thus, you need to make sure you have enough memory space for that. Getting a memory card dedicated to this project will make perfect sense.
A Tripod
You’d need a tripod to ensure your camera maintains a high level of stability. You can use weights to support the tripod if you feel like you should.
Learn more about the hardware that can be useful for beginner filmmakers.
A Post-Production Software
Animotica is one of the best time-lapse software for Windows 10/11. Click on the button below to get it for free. If you have a Mac, iMovie can do the job.

Now that you’ve gotten all your tools ready, let’s discuss how you can get the actual work done.
There are two popular ways of shooting a time-lapse video: using a video, and using images.
The process of recording time-lapse video
Using a Video
Some people prefer to set their camera up and shoot a long, continuous video, which they will speed up using a video editor. This is the easiest and commonest method of shooting a time-lapse video. It also gives a more natural result.
However, there are downsides to it:
- The video file will be super large and take longer to render due to the sheer amount of data it will contain.
- It will be difficult to fine-tune it, also because of its size.
Using Images
This is a more professional and efficient way of shooting time-lapses. You can set a camera on a tripod and make it take pictures at intervals from the beginning of the time-lapse to the end.
Afterward, you can merge these images together in a single video.
This is preferable because it eliminates fluff, produces a smaller video file, and makes it easier to fine-tune with transitions and effects.
Now that we’ve settled this, let’s see how you can create a time-lapse video using these two techniques with Animotica.
Method 1: How to Create Time-Lapse with Video
This is pretty straightforward. So let’s just jump into it.
Step 1: Shoot a Non-stop Video
Set your camera and tripod up and focus on your subject. Make sure the tripod is stable and well-positioned. Next, hit the record button to begin shooting. When you’re done recording, you can proceed to edit.
Step 2: Import your Video
Once you’ve downloaded and opened Animotica, hit on New Project. From the new project window, select Add Video/Photo Clips. Navigate to where you’ve stored your video to add it to the editor.

Step 3: Cranking up the Speed
By now, you might’ve noticed that time-lapse is the direct opposite of slow-motion since everything is getting sped up quite rapidly. In time-lapse, the speed setting is where the magic usually happens. And Animotica puts this magic right at the tip of your fingers.

Simply click on the video you’ve imported. This reveals a bunch of editing options among which you can find the speed setting.

Click on Speed to reveal a speed bar. Adjust the speed bar to your preference, the higher up you go, the faster the video.
Done! Your time lapse video is ready to go.
Step 4: Work on the Sound
How to delete the sound from a time-lapse video
Your footage most probably came with some natural sounds. Most often than not, these sounds are not nice to the ear, especially since you’d be speeding things up a lot. What you’d need to do is to get rid of the sound. To do this, tap your cursor on the video to reveal the editing options. Select volume.
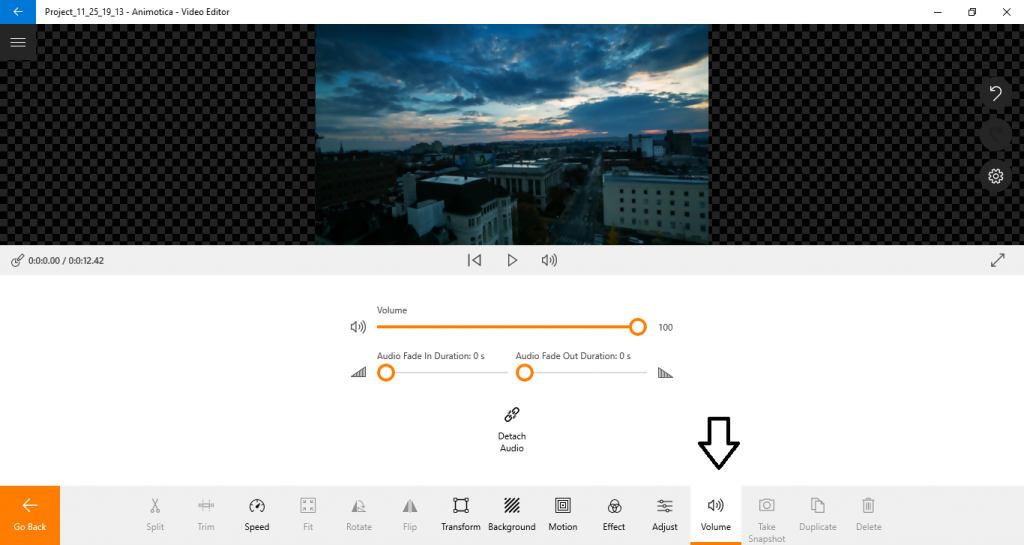
Once you hit that option, you’d see another option, Detach Audio. After detaching the audio, you’d see the delete option at the foot of the window.
How to add sound to a time-lapse video
Having deleted the noise, you might want to add your audio to spice things up a little. To do this, immediately you’ve removed the old sound, you’d find the audio button at the foot of the window. Select this option to navigate to a new window.

This new window shows you a bunch of tunes from Animotica’s library. However, if you have another audio in mind, you can simply hit choose file to navigate to your storage area.

Step 5: Other Features You Can Use (optional)
Just to give some extra touch of finesse to your time lapse footage, you can use a bunch of additional features from Animotica. The most popular features are found under the Overlays section.

The Overlays feature is pretty simple to use. It allows you to add texts, GIFs, Stickers, and more to your footage. Simply click on the Add button to reveal the overlay options. You can learn more on how to use overlays here.
Step 6: Saving your Project
When you’re satisfied, you can save your work by clicking the Save button at the bottom right corner of the editor’s screen. On the new window, you’ll notice that Animotica sets some default parameters already for resolution and bitrate. These parameters represent the best balance between size and quality.

Thus, it is advisable to not make any changes. Just go ahead and click Save As to set a name for your final product. However, if you’d like to know more about what each setting represents and how they work, you can do so in this post.
The video used in this example belongs to KML from Pexels. We hope you like it as much as we do!
Method 2: How to Make a Time-Lapse Video With Images
To make a time-lapse video with images, here are the steps you can take:
Step 1: Capture your Image Sequence
Set your camera to focus on your subject. But this time, instead of filming non-stop, you should set an automatic timer so your camera can automatically shoot at intervals. Many modern cameras come with this feature, but if yours don’t, you can get an intervalometer.
Be sure to turn off the camera’s autofocus and auto white balance. This is because changes in lighting and movement of objects can easily disrupt the focus when in auto mode.
Once you get your images captured, you can now make your time-lapse video in post-production.
Step 2: Upload the Images to Animotica
Just as already described above, launch Animotica, create a new project, and upload the images into the editor. Be sure upload these images sequentially, any mistakes can ruin the entire clip!
Step 3: Add Transitions between the Clips
Since you’re dealing with different clips, a simple transition like Opacity can make the video ‘pop.’ So it’s advisable to use just one transition effect across all the clips.
To do this, hit on Project Settings.

Next, select Transitions. Choose Opacity and set the duration to 0.2 seconds. Afterward, hit X.

Step 4: Add Music
Hit on Add, select Add Audio and you’ll be taken to Animotica’s music library. If you would like to use audio outside the library, hit Select File. Navigate to where you’ve stored the file and upload it.

Step 5: Fine-tune, Preview and Save
You can add effects and overlays to your video if you wish to. If you think it’s all good, export your project as described in the previous section.
Is it possible to time-lapse an existing video?
Yes, you can time-lapse an existing video. As you’ve already seen, time-lapsing is not that complicated. If you already have a video clip, you can simply add it to Animotica and speed it up!
Conclusion
Time-lapse videos are among the game changers in cinematography. It does take plenty of dedication to get that perfect footage. But after your first try, you will begin to find it easier and more fun. I hope that this guide on how to make a time-lapse video on Windows 10/11 is helpful.
With Animotica, a time-lapse video editor that is simple enough for beginners and high-end enough to incorporate advanced features, things are going to get even better for you.
Ultimately, the age-long saying is absolutely correct: practice makes perfect!
You may also like:
How to Stabilize a Shaky Video